Building an on-chain TO-DO list


🛠️What are we building?
Our objective is to craft a comprehensive full-stack to-do-list application. This won't be your everyday to-do list, though. We're going to integrate blockchain into it. We'll be writing our smart contract and deploying it on the Polygon Mumbai Testnet.
You might ask, why a to-do list on a blockchain? Here's why: this project is a stepping stone, a learning opportunity. A to-do list is a classic project that developers often build when they are starting to learn a new language or technology. It's a simple enough concept that allows us to focus on the new technology.
📝Prerequisites
If you've worked with Javascript and Reactjs before, you'll be fine.
You need Nodejs installed. You also need to install and set up Metamask for Chrome.
And lastly, curiosity to learn 🤔
🔬Let's get started
Head over to Remix IDE. Remix is a no-setup tool to develop and deploy smart contracts on EVM. We'll use this instead of the traditional Hardhat setup to save time and focus more on building the project. Create a file named TodoList.sol.
'.sol' is a file extension for Solidity contracts files just like we have '.py' for Python and '.js' for Javascript files.

Now we'll deep dive into writing some solidity. License Identifier and solidity compiler version are always defined first. You can learn more about them in the docs here.
Next, we instantiate our contract with a name, this is just like classes in object-oriented programming.
// SPDX-License-Identifier: MIT
pragma solidity ^0.8.9;

contract TodoList {}
Next, we will write a function to add tasks to our to-do list. Our function will take in a string as an argument and push it on a mapping. Mapping is a data structure that stores a bunch of key-value pairs. We'll also keep a count of the tasks we have added so we can use their index while fetching data later.
// SPDX-License-Identifier: MIT
pragma solidity ^0.8.4;

contract TodoList {
    mapping (uint256 => string) public tasks;
    uint256 public count = 0;

    function addTask(string calldata task) public {
        tasks[count] = task;
        count++;
    }
}
In the addTask function, you might be puzzled about the calldata argument. There are other keywords, such as memory and storage, which specifies the storage area where the data will be stored. You can find more details about what these terms mean, where they are used, and when to use them in this comparison of calldata vs memory
However, there's an issue here. We don't know whether the task is complete. How do we mark the task as done in our list? To address this, instead of pushing the string to the mapping, let's push a struct to the mapping. A struct essentially allows you to create a new data type. In this struct, we'll store a string called task and a boolean called isCompleted
// SPDX-License-Identifier: MIT
pragma solidity ^0.8.4;

contract TodoList {
    struct Task {
        string task;
        bool isCompleted;
    }

    mapping (uint256 => Task) public tasks;
    uint256 public count = 0;
    function addTask(string calldata task) public {
        TaskItem memory item = TaskItem({ task: task, isCompleted: false });
        tasks[count] = item;
        count++;
    }
}
Can you notice the changes here?? We defined a new data type with a keyword struct and modified our mapping to push our Task data type.
That's great, we can now successfully add tasks to our list ✅. Pat your backs.
Coming right next, we need a function that will check off the task when we complete it.
// SPDX-License-Identifier: MIT
pragma solidity ^0.8.4;

contract TodoList {
    struct Task {
        string task;
        bool isCompleted;
    }

    mapping (uint256 => Task) public tasks;
    uint256 public count = 0;

    function addTask(string calldata task) public {
        Task memory item = Task({ task: task, isCompleted: false });
        tasks[count] = item;
        count++;
    }

    function completeTask(uint256 id) public {
          require(!tasks[id].isCompleted, "Task already completed");
          tasks[id].isCompleted = true;
    }
}
We retrieve the task's ID, which corresponds to the counter we've set, and check if it's already completed. If it is, we use the require keyword provided by Solidity to throw an error indicating that the task is already completed. If it's not, we change the Boolean to true to mark the task as completed.
We're pretty much done with the contract, yay 🍾. One thing left, we built this to-do list for ourselves, to keep account of our tasks, right. We don't want other people to call our contract. For this, we will specify the owner of the contract as the one who deployed it.
address public owner;

constructor () {
    owner = msg.sender;
}
msg.sender is a keyword given in solidity language that returns the address of the person deploying the contract.
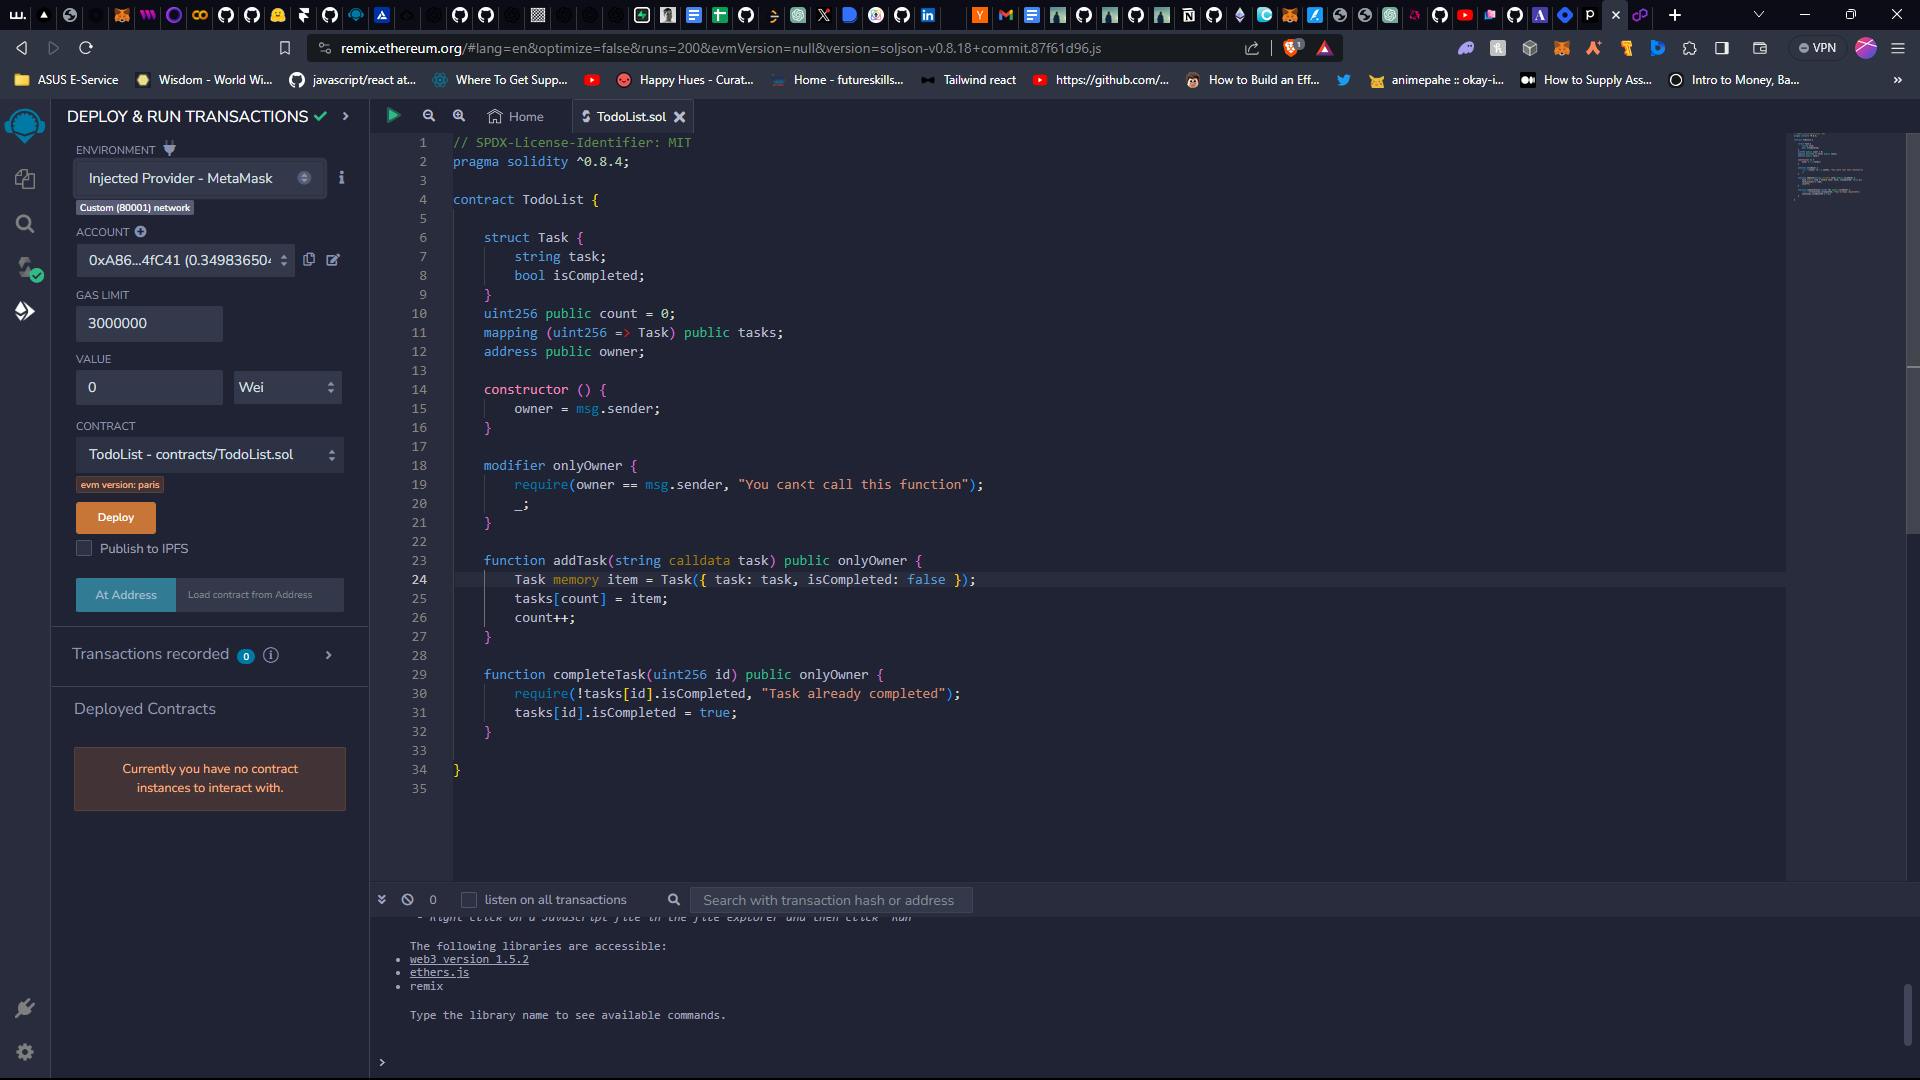
Next, we will use a modifier to check if msg.sender is the owner or not. modifier is code that can be run before a function call to restrict access and validate inputs. Our final contract should look like this.
// SPDX-License-Identifier: MIT
pragma solidity ^0.8.4;

contract TodoList {

    struct Task {
        string task;
        bool isCompleted;
    }
    uint256 public count = 0;
    mapping (uint256 => Task) public tasks;
    address public owner;

    constructor () {
        owner = msg.sender;
    }

    modifier onlyOwner {
        require(owner == msg.sender, "You can't call this function");
        _;
    }

    function addTask(string calldata task) public onlyOwner {
        Task memory item = Task({ task: task, isCompleted: false });
        tasks[count] = item;
        count++;
    }

    function completeTask(uint256 id) public onlyOwner {
        require(!tasks[id].isCompleted, "Task already completed");
        tasks[id].isCompleted = true;
    }
}
⛽Deploying contract on Polygon Network
Let's get some faucet tokens before we get started with our deployment. Think of faucets as fake money we require to deploy and interact with our dapp. You can obtain it for free here 🪙:
-

Paste in your address and press on 'Send Me Matic'. You will receive your faucet MATIC tokens. Switch to polygon mumbai network to check if you recieved MATIC or not.

If you don’t have Polygon Mumbai Testnet chain in your metamask, you can add it easily only in one click. Go over to mumbai.polygonscan.com and scroll down. There will be "add mumbai network" button.

Now that we have our faucet ready, let's head back to Remix and deploy our contract.

Before, we deploy, we need to compile our contract. Press ctrl+s or click on the second last icon on the left sidebar. It represents a solidity compiler and it will compile our contract. If all goes well, we'll be able to see a green tick ✅. If you face any trouble or get any error, you can google the error or just DM me on Twitter.
Once compiled, select the last icon which will help us deploy and interact with the contract. Change the first tab to "Injected Provider- Metamask". This will pop up your metamask wallet just to make sure you're on the right network and connected to dapp. Click on the orange button "Deploy".

Metamask will pop up again for confirmation. we’ll need to pay some gas to deploy the contract, but no worries, we already have a bunch of MATIC tokens ready.
Once your contract is deployed, it will appear in the tab below.

You can copy the address and verify the deployment of the contract at mumbai.polygonscan.com.
Voila 🎊, you just deployed your first-ever contract on Polygon. Clap for yourself.
As you can see, there's only one transaction, which is the Contract Creation. Now, we can integrate this contract into our front end to create and complete tasks. But before we do that, let's test it directly on Remix since it allows us to interact with our contract. Navigate to the 'Deployed Contracts' section located in the bottom left corner. Here, you'll see all the functions of our contract. Let's go ahead and add a task

Just add a string over here and click on addTask , you’ll see Metamask will ask you to confirm the transaction we’ll have to pay some gas to add a task as this is a write operation. All the write operations that will need some gas are in the orange tab and read operations in the blue tab.
Once the task is added you can check the task by using the id in tasks to read the task at that index.

You can see the task added is "learn solidity". Before we start our front end let’s do one last thing, copy the contract address of the deployed smart contract and paste it somewhere. We'll also need the contract abi which we can obtain from the tab below

Save the address and abi as we'll need it in our UI to interact with to-do list dapp.
NOTE: save your abi and address in a notepad.
Let's head over to writing some react code now.
🌈NextJS app with Rainbowkit
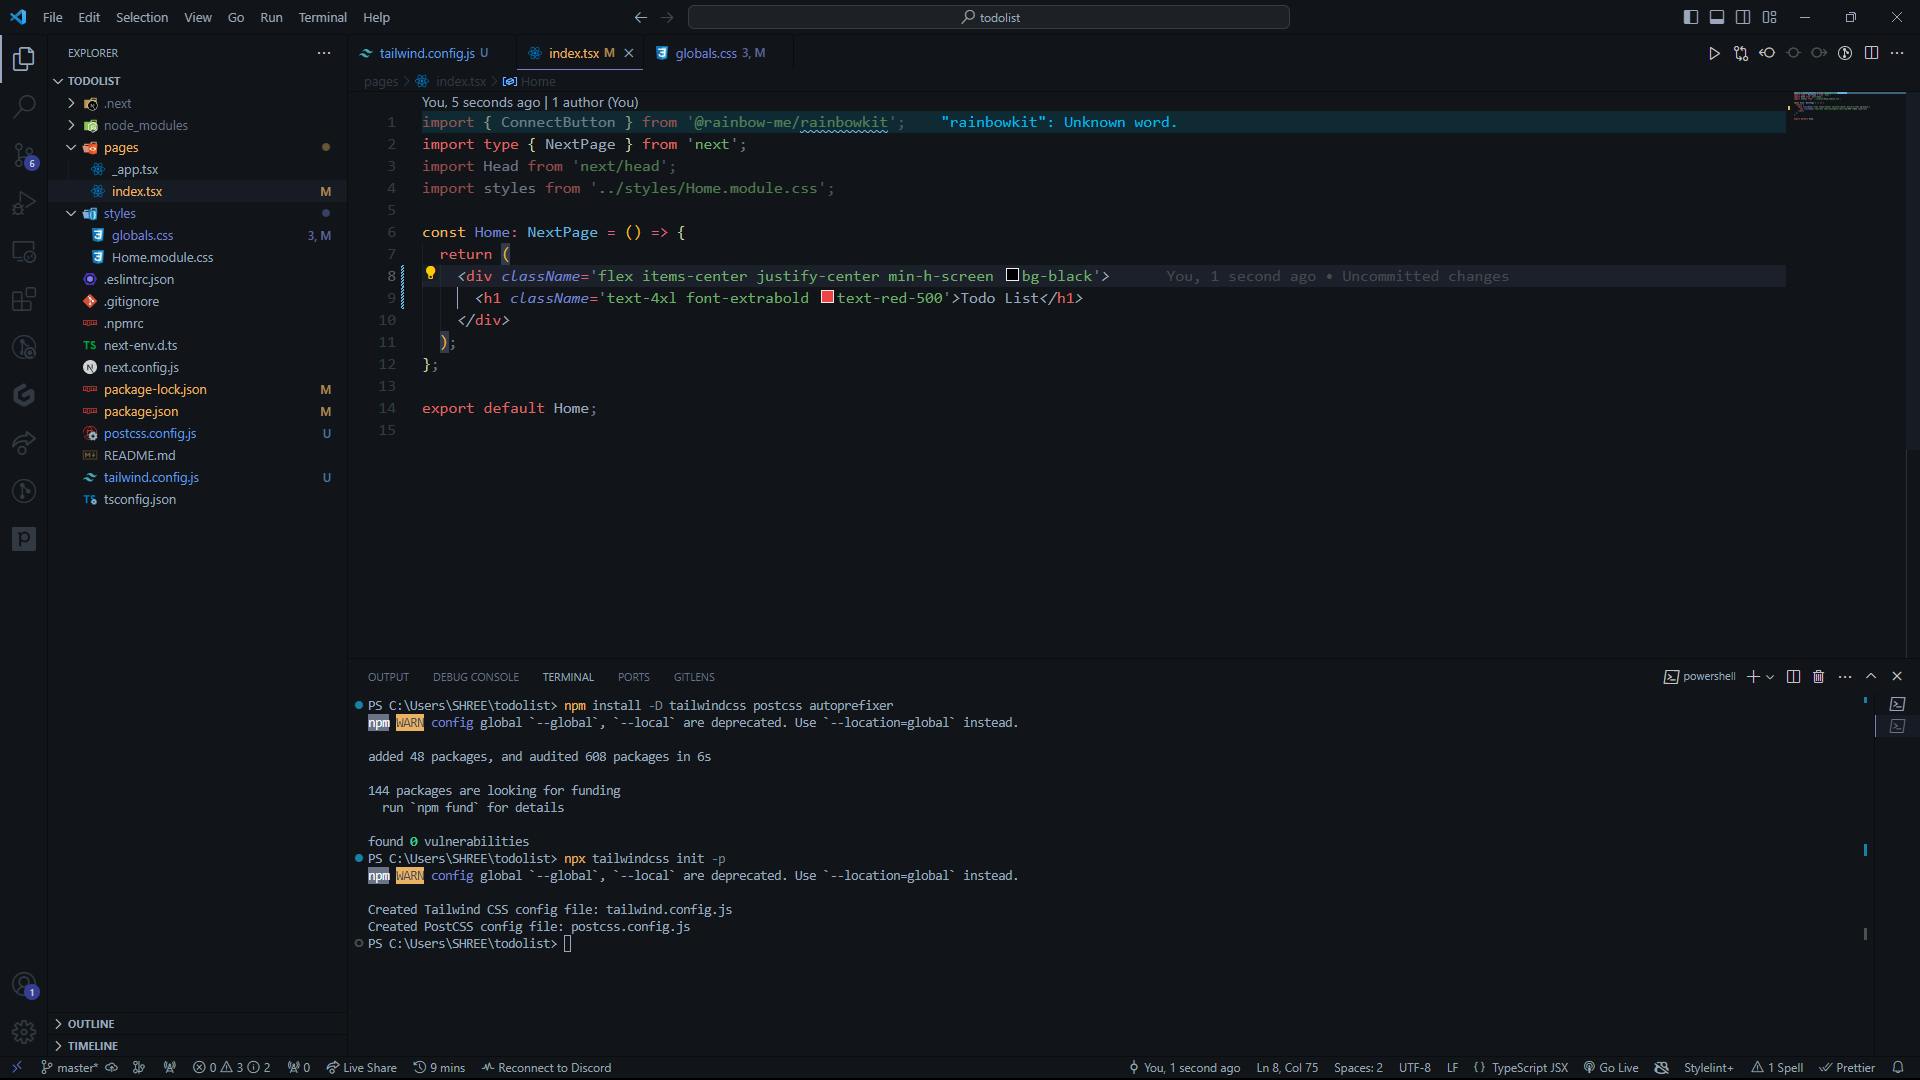
Open up your terminal and copy the following command
npm init @rainbow-me/rainbowkit@latest
This command will initialise your git repository as well set up all the required files with RainbowKit + wagmi + Next.js. Now move into the directory using cd todolist .
We will also need to install Tailwind css. Follow the guide here install Tailwind.
Your folder structure should look like this. Run command npm run dev to start up your local server.

That's it, we are done with the majority of the work, good work. Get hydrated, drink some water and we head back to integrating our contract.
In your _app/tsx you can find the code for Rainbowkit setup. It is already done for us through the command. Let's go through it and understand what it does.
import '../styles/globals.css';
import '@rainbow-me/rainbowkit/styles.css';
import { getDefaultWallets, RainbowKitProvider, midnightTheme } from '@rainbow-me/rainbowkit';
import { configureChains, createConfig, WagmiConfig } from 'wagmi';
import {
  goerli,
  mainnet,
  polygon,
  polygonMumbai,
} from 'wagmi/chains';
import { publicProvider } from 'wagmi/providers/public';

const { chains, publicClient, webSocketPublicClient } = configureChains(
  [
    mainnet,
    polygon,
    polygonMumbai,
    ...(process.env.NEXT_PUBLIC_ENABLE_TESTNETS === 'true' ? [goerli] : []),
  ],
  [publicProvider()]
);

const { connectors } = getDefaultWallets({
  appName: 'TodoList App',
  projectId: 'your project id',
  chains,
});

const wagmiConfig = createConfig({
  autoConnect: true,
  connectors,
  publicClient,
  webSocketPublicClient,
});

function MyApp({ Component, pageProps }) {
  return (
    <WagmiConfig config={wagmiConfig}>
      <RainbowKitProvider chains={chains} theme={midnightTheme()}>
        <Component {...pageProps} />
      </RainbowKitProvider>
    </WagmiConfig>
  );
}

export default MyApp;
We start by importing all the required CSS files, functions and modules from WAGMI and Rainbowkit. The 'configureChains' function is used to set up the Ethereum networks that the application will interact with and the providers to interact with those networks. It's set up to support multiple Ethereum networks and a testnet conditionally. We will be using only polygon mumbai for now. 'getDefaultWallets' function is used to generate the required connectors for the wallet. The 'createConfig' function is used to create a configuration for WAGMI, which includes the connectors, publicClient, and webSocketPublicClient . Lastly, we wrap our MyApp
which is the root component inside WagmiConfig and RainbowkitProvider .
Next, go over to cloud.walletconnect.com. Sign in and create a new project. Obtain the special projectId and replace it in the code.

In index.tsx file, add in the ConnectButton component below heading. I have made some changes in styling and appearance, you can customize it to your choice. Show your creativity.
Moreover, change the chain to polygonMumbai

Before moving ahead with integrating smart contracts, let's make our UI a bit cleaner. feel free to showcase your creativity. Check out the themes and cool mode, it's really cool (not kidding 😉).
import { ConnectButton } from '@rainbow-me/rainbowkit';
import type { NextPage } from 'next';
import { useAccount } from 'wagmi';

const Home: NextPage = () => {
  const { address } = useAccount();
  return (
    <div className="flex flex-col justify-center items-center bg-black text-white">
      <div className="flex items-center justify-between w-full px-4 py-2">
        <p className="text-xl font-bold">Todo-List</p>
        {
          address && (
            <ConnectButton />
          )
        }
      </div>
      <div style={{ minHeight: '95vh' }} className="flex flex-col items-center justify-center gap-4 w-full">
        <h1 className="text-4xl font-extrabold">Todo List</h1>
        {
          !address && (
            <ConnectButton />
          )
        }
      </div>
    </div>
  );
};

export default Home;
🧰Integrate our contract
Now, you remember we saved our CONTRACT_ABI and CONTRACT_ADDRESS , let's bring them out. We will need them to implement our to-do list login and interact with the contract. If you forgot to save these variables, go back and deploy the contract once again. A new abi and address will be generated and you can paste in that.
Create a new src folder and a file contract.js and paste in your contract address and abi like this

Let's use hooks from wagmi library to connect our contract with app. In this code, getContract() is only called when walletClient is not null. If walletClient is null, the contract will remain undefined.
const getTasks = useCallback( async () => {
        try {
            let tasks = [];
            let tasks_count = await contract.read.count();
            console.log("TOTAL NUMBER OF TASKS ", tasks_count.toString());
            if (tasks_count) {
                tasks_count = +tasks_count;
                // Fetch tasks
                for (let i = 0; i < tasks_count; i++) {
                    const task = await contract.tasks(i);
                    if (task) {
                        tasks.push(task);
                    }
                }
            }
            // Set task in the state
            setTasks(tasks);
        } catch (err) {
            console.log(err);
        }
    }, [contract]);

  const addNewTask = async() => {
    try {
      const newTask = await contract.write.addTask([input])
      console.log(newTask)
      setTasks(prev => [...prev, [input, false]])
      setInput(null)
      let inputTaskElement = document.getElementById('input-task');
      if(inputTaskElement) {
        inputTaskElement.value = "";
    }
    } catch(err) {
      console.log(err)
    }
  }

  const completeTask = async(task) => {
    try {
      console.log(tasks)
      const taskIndex = tasks.findIndex(a => a[0] === task)
      console.log("index ", taskIndex)
      const completeTask = await contract.write.completeTask(taskIndex)
      console.log(completeTask)
      await completeTask.wait()
      const newTasks = tasks.filter(a => a[0] !== task)
      console.log(newTasks)
      setTasks(newTasks)
    } catch(err) {
      console.log(err)
    }
  }

  useEffect(() => {
        if (contract) {
            getTasks();
        }
    }, [contract, getTasks]);
These are the functions I added to use our addTask, getTask and completeTask functions from our contract. Pay attention to how I have written contract.read and contract.write. These are new viem methods introduced recently. write property allows us to work with non-view functions of the contract. Also, remember that the addTask function is marked with the onlyOwner modifier, which means that only the owner of the contract can call this function. Make sure that the account you're using to call this function is the owner of the contract.
Here's the whole index.js file:
import { ConnectButton } from '@rainbow-me/rainbowkit';
//import type { NextPage } from 'next';
import { useState, useEffect, useCallback } from "react";
import { useAccount, useWalletClient } from 'wagmi'
import { getContract } from 'viem'
import { CONTRACT_ABI, CONTRACT_ADDRESS } from '../src/contract'


const Home = () => {
  const [tasks, setTasks] = useState([]);
  const [input, setInput] = useState(null);

  const { address } = useAccount();
  const { data: walletClient } = useWalletClient();

  let contract;
  if(walletClient){
     contract = getContract({
      address: CONTRACT_ADDRESS,
      abi: CONTRACT_ABI,
      walletClient
    })
    console.log(contract);
  }

  const getTasks = useCallback( async () => {
        try {
            let tasks = [];
            let tasks_count = await contract.read.count();
            console.log("TOTAL NUMBER OF TASKS ", tasks_count.toString());
            if (tasks_count) {
                tasks_count = +tasks_count;
                // Fetch tasks
                for (let i = 0; i < tasks_count; i++) {
                    const task = await contract.tasks(i);
                    if (task) {
                        tasks.push(task);
                    }
                }
            }
            // Set task in the state
            setTasks(tasks);
        } catch (err) {
            console.log(err);
        }
    }, [contract]);

  const addNewTask = async() => {
    try {
      const newTask = await contract.write.addTask([input])
      console.log(newTask)
      setTasks(prev => [...prev, [input, false]])
      setInput(null)
      let inputTaskElement = document.getElementById('input-task');
      if(inputTaskElement) {
        inputTaskElement.value = "";
    }
    } catch(err) {
      console.log(err)
    }
  }

  const completeTask = async(task) => {
    try {
      console.log(tasks)
      const taskIndex = tasks.findIndex(a => a[0] === task)
      console.log("index ", taskIndex)
      const completeTask = await contract.write.completeTask(taskIndex)
      console.log(completeTask)
      await completeTask.wait()
      const newTasks = tasks.filter(a => a[0] !== task)
      console.log(newTasks)
      setTasks(newTasks)
    } catch(err) {
      console.log(err)
    }
  }

  useEffect(() => {
        if (contract) {
            getTasks();
        }
    }, [contract, getTasks]);

  return (
        <div className="flex flex-col justify-center items-center bg-black text-white">
            <div className="flex items-center justify-between w-full px-4 py-2">
                <p className="text-xl text font-bold">Todo-List</p>
                {address && <ConnectButton />}
            </div>
            <div
                style={{ minHeight: "95vh" }}
                className="flex flex-col items-center justify-center gap-4 w-full"
            >
                <h1 className="text-6xl text-fuchsia-300 font-extrabold">Todo List</h1>
                {!address && <ConnectButton />}

        {/* Add Task */}
        <div className="flex flex-row items-center justify-center gap-4">
          <input id="input-task" onChange={(e) => setInput(e.target.value)} className="px-4 py-2 rounded-xl text-black" placeholder="Add a task..." />
          <button onClick={addNewTask} className="px-4 py-2 rounded-xl border border-purple-700 bg-purple-700 text-white font-bold transform hover:scale-105">Add Task</button>
        </div>

        {/* All Tasks */}
                <div className="flex items-center justify-center flex-col">
                    {tasks.length > 0 &&
                        tasks.map((taskItem, i) => {
                            return (
                                <div key={i}>
                  {/* Check if task is not completed */}
                  {
                    !taskItem[1] && (
                      <div className="flex items-center justify-between gap-3 py-2">
                        <p>{taskItem[0]}</p>
                        <button onClick={() => completeTask(taskItem[0])} className="px-2 rounded-xl bg-white text-black border border-blue-400 transform hover:scale-105">Complete</button>
                      </div>
                    )
                  }
                                </div>
                            );
                        })}
                </div>
            </div>
        </div>
    );
};

export default Home;
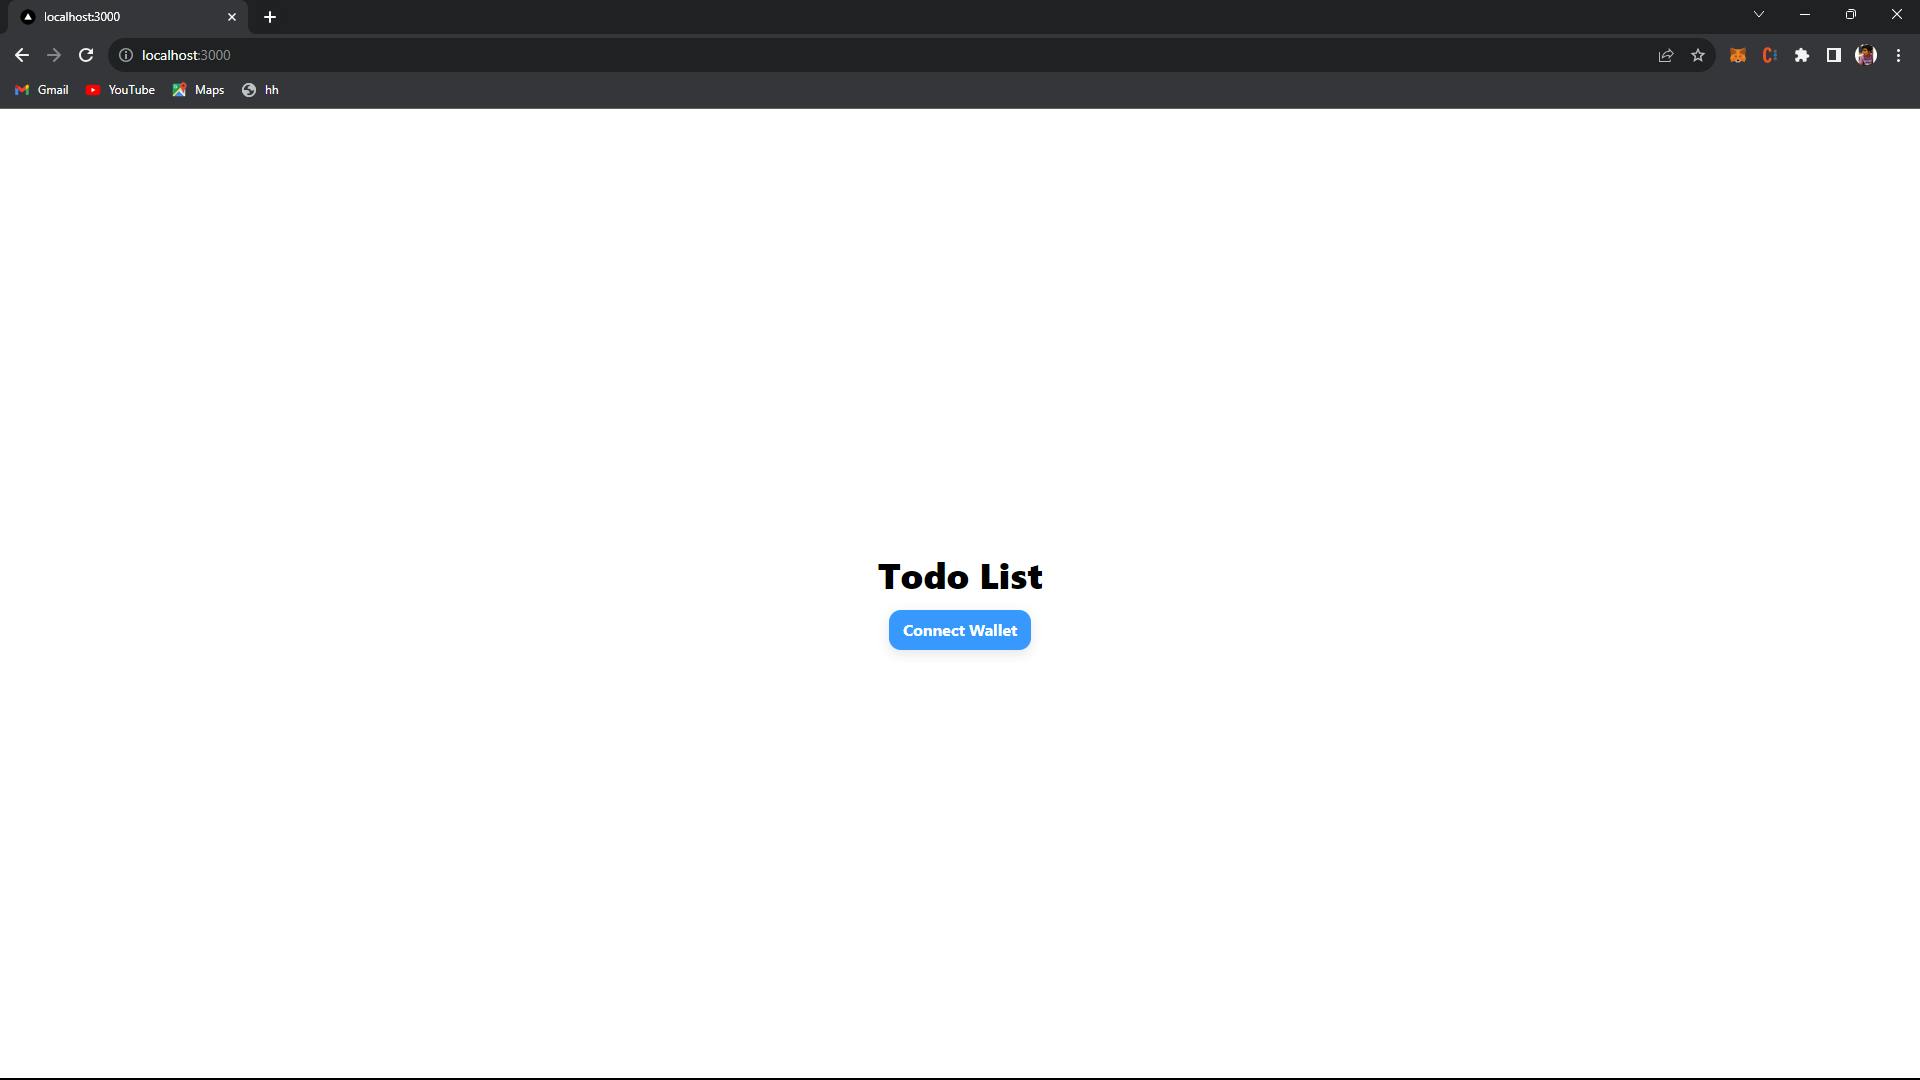
And here's our output, voila🎉, our on-chain to-do list app is done.

🥳All done
Y'all are amazing, you learned a new language and built a beautiful to-do list. What's next you ask? here are some challenges for you:
Display time-stamp of the task ⌛
Improve UI
explore wagmi and viem and try adding more wallet
Feel free to reach out to me with any doubts or suggestions. Stay hydrated and stay curious, happy coding 🚀.